Wednesday, September 25, 2013

Quick and easy baby blanket

Lately it's been baby bloom in all its glory around me, and so many babies call for many crocheted presents!

I had never made any blanket till now, so I decided to finally make one. Even if it's nothing fancy and is an easy pattern, I wanted to post a picture of it. After all, since my two little girls are now taking all my time, I am extremely happy and proud to have finished something.
The end result is a huge granny square of 36"x36".

Also I still want to update this blog when I can, hopefully next time with a new amigurumi pattern (I'm thinking a soccer popple!).

Here is the blanket in progress.


And now with the baby girls modeling ;)


Note for those who would like to make it:
It took 4 balls of Loops&Thread Country Loom Baby in blue color + 1 ball of white.
The gauge is roughly 4 groups of 3 dc = 6 inches in width, and 1 inch in height.
The border being clusters of 2dc,ch2,2dc in each space around, 3 of these clusters in each corner.

Now time to make a couple more of those for some other friends :)

Sunday, May 26, 2013

Lion and Dragon baby blankies.

For the imminent arrival of our baby girls (yes, there is an “s”, we're having 2 *\o/*), I asked Tony, my husband, what kind of animals he would like them to have as baby blanky-toys.
Since he really likes the series Games of Thrones, he suggested a dragon and a lion, and while I admit that I was more thinking about common animals such as bunnies, mice, cats, dogs; I had fun making a ferocious dragon and his friend the mighty lion.
I guess now we just need to figure out who will be Daenerys and who will be Cersei? :)


Here I'm sharing with you the patterns for the head since it's really fast, straightforward, and can make up for a pretty cute baby gift!

Note: We actually call these doudous in French, but I learned that in English it didn't have the same meaning :)

Requirements:

  • Crochet Hook H (5mm)
  • Tapestry Needle
  • Any colors of baby yarn you want
  • Stuffing

Abbreviations / Terminology used:

  • st: stitch
  • sc: single crochet
  • ss: slip stitch
  • hdc: half double crochet
  • dc: double crochet
  • fhdc: foundation half double crochet
  • 2 sc in next st (increase)
  • 2 sctog: 2 single crochet together (decrease)


The baby blankies are composed with a granny square + an animal head. I chose a variegated yarn for the granny squares, then made the heads with colors that were within the granny square.


Head (same shape for both the lion and the dragon):

    Round 1: 6 sc in magic ring (6)
    Round 2: 2 sc in each st around (12)
    Round 3: *1 sc, 2 sc in next st* repeat (18)
    Round 4: *2 sc, 2 sc in next st* repeat (24)
    Round 5: *3 sc, 2 sc in next st* repeat (30)
    Rounds 6-9: sc around (30)
    Round 7: *3 sc, 2 sctog* repeat (24)
    Round 8: *2 sc, 2 sctog* repeat (18)
    Round 9: *1 sc, 2 sctog* repeat (12)
    (Start adding stuffing)
    Round 10: *2 sctog* repeat (6)
    Add more stuffing, finish off, leaving long tail for sewing.

Dragon features:


Mohawk:

ch 16, turn, skip 1st st
A: ss + sc in same st
B: hdc + dc + picot edge + hdc in same st
C: sc + sc in same st
repeat ABC till the end, it should give 5 spikes

Muzzle:

4 fhdc, 3 hdc in turn, 2 hdc around, 3 hdc in turn
add nostrils

Ears:

ch 4, turn, skip 1st st
ss, sc in same st
hdc, dc, hdc in same st
sc, ss in same st

Lion features:

Mane:

ch 22, turn, skip 1st st
A: ss + sc in same st
B: hdc + dc + hdc in same st
C: sc + sc in same st
repeat ABC till the end, it should give 7 bumps

Muzzle:

Round 1: 6 sc in magic ring (6)
Round 2: 2 sc in first 3 st, 2 hdc in last 3 st (6sc+6hdc)
Finish off with a sc in the next st and embroid the mouth and nose.


Assembly line:

Attach the different elements together using the pictures as guidelines, sow the eyes, and finally attach the head firmly to the granny squares. Time to make lots of these cuties!
Hope you'll enjoy making them as much as I did :)


Monday, May 6, 2013

Monsieur Miaou


My cousin and his lovely wife had an adorable baby girl a month ago and I made her a little friend that could be called Monsieur Miaou.

Here is the pattern to make him, I used a thick yarn and a big hook since I wanted him to be big!

Requirements:

  • Crochet Hook H (5mm)
  • Tapestry Needle
  • Any color of yarn you want this kitty to be.
  • Stuffing

Abbreviations / Terminology used:

  • st: stitch
  • sc: single crochet
  • ss: slip stitch
  • hdc: half double crochet
  • fhdc: foundation half double crochet
  • 2 sc in next st (increase)
  • 2 sctog: 2 single crochet together (decrease)

Here my main color (MC) was green and my secondary color (SC) for the paws was yellow.
Let's start him from bottom up :)

Legs (make 2, only cut yarn for the first one, you'll attach both from the second one):

    Round 1: (SC) 6 sc in magic ring (6)
    Round 2: 2 sc in each st around (12)
    Round 3: (MC) *3 sc, 2 sc in next 3 st* repeat around (18)
    Rounds 4-12: sc around (18)

Join the first leg to the second leg with 4 ss between them (see picture below). Start the body from here.

Body:

    Rounds 1-5: sc around (30)
    Round 6: *2 sctog, 13 sc* repeat once (28)
    Round 7: sc around (28)
    Round 8: *2 sctog, 12 sc* repeat once (26)
    Round 9: sc around (26)
    Round 10: *2 sctog, 11 sc* repeat once (24)
    Round 11: *2 sc, 2 sctog* repeat around (18)
    Round 12: *1 sc, 2 sctog* repeat around (12)
    Round 13: *2 sctog* repeat around (6)
Cut yarn, leaving tail for sewing. Add stuffing.

Arms (x2):

    Round 1: (SC) 6 sc in magic ring (6)
    Round 2: 2 sc in each st around (12)
    Round 3: *5 sc, 2 sc in next st* repeat (14)
    Rounds 4-10: (MC) sc around (14)
    Round 11: *5 sc, 2 sctog* repeat (12)
    Round 12: *4 sc, 2 sctog* repeat (10)
    Round 13: *3 sc, 2 sctog* repeat (8)
    Finish off leaving tail for sewing. Add stuffing.

Head:

    Round 1: (MC) 6 sc in magic ring (6)
    Round 2: 2 sc in each st around (12)
    Round 3: *3 sc, 2 sc in next 3 st* repeat (18)
    Round 4: *5 sc, 2 sc in next 3 st, 1 sc* repeat (24)
    Round 5: *6 sc, 2 sc in next st, 1 sc, 2 sc in next st, 1 sc, 2 sc in next st, 1 sc* repeat (30)
    Round 6: *4 sc, 2 sc in next st, 3 sc, 2 sc in next st, 3 sc, 2 sc in next st, 2 sc* repeat (36)
    Round 7: *6 sc, 2 sc in next st, 3 sc, 2 sc in next st, 3 sc, 2 sc in next st, 3 sc* repeat (42)
    Rounds 8-12: sc around (42)
    Round 13: *6 sc, 2 sctog, 3 sc, 2 sctog, 3 sc, 2 sctog, 3 sc* repeat (36)
    Round 14: *4 sc, 2 sctog, 3 sc, 2 sctog, 3 sc, 2 sctog, 2 sc* repeat (30)
    Round 15: *6 sc, 2 sctog, 1 sc, 2 sctog, 1 sc, 2 sctog, 1 sc* repeat (24)
    Round 16: *5 sc, 2 sctog for 6 st, 1 sc* repeat (18)
    Round 17: *3 sc, 2 sctog for 6 st* repeat (12) – add stuffing
    Round 18: *2 sctog* repeat around (6)
Finish off.

Ears:

    Round 1: 6 sc in magic ring (6)
    Round 2: 2 sc in each st around (12)
    Round 3: *5 sc, 2 sc in next st* repeat (14)
    Round 4: *6 sc, 2 sc in next st* repeat (16)
Finish off leaving tail for sewing.

Eyes:

    Round 1: 6 sc in magic ring (6)
    Round 2: 2 sc in each st around (12)
    Finish off leaving tail for sewing.
    Add color of choice for the pupil with tapestry needle.

Tail:

20 fhdc (or as long as you want), ss in each hdc around

Assembly line:

Attach the ears and eyes to the head, with the tapestry needle make the nose/mouth, attach the arms and the tail to the body, and here is the little cutie done :)

From the back:


I plan in making a Miaou family with Monsieur, Madame and their children, I'll post pictures of them when they are finished ;)

Happy crochetting!


Tuesday, February 5, 2013

Pandi Panda

Today, let it be panda day!
I made for one of my friend a little panda, here is the pattern which is pretty straightforward :)


Requirements:

  • Crochet Hook G (4,25mm)
  • Tapestry Needle
  • White and Black yarn
  • Stuffing

Abbreviations / Terminology used:

  • st: stitch
  • sc: single crochet
  • 2 sc in next st (increase)
  • 2 sctog: 2 single crochet together (decrease)
  • 3 sctog: 3 single crochet together (decrease)


Eyes (x2) Black Yarn:

    Round 1: 6 sc in magic ring (6)
    Round 2: 2 sc in next 3 st (9)
    Finish off leaving tail for sewing.


Ears (x2):

    Round 1: 6 sc in magic ring (6)
    Round 2: 2 sc in each st around (12)
    Round 3: *6 sc, 2 sc in next st* repeat (14)
    Round 4: *7 sc, 2 sc in next st* repeat (16)
    Round 5: *2 sc, sctog* repeat around (12)
    Finish off leaving tail for sewing. No stuffing needed for the ears.


Head/Body:

    Round 1: (White Yarn) 6 sc in magic ring (6)
    Round 2: 2 sc in each st around (12)
    Round 3: *1 sc, 2 sc in next st* repeat around (18)
    Round 4: *2 sc, 2 sc in next st* repeat around (24)
    Round 5: *3 sc, 2 sc in next st* repeat around (30)
    Round 6: *4 sc, 2 sc in next st* repeat around (36)
    Round 7: *5 sc, 2 sc in next st* repeat around (42)
    Rounds 8-12: sc around (42)
    Round 13: *5 sc, 2 sctog* repeat around (36)
    Round 14: *4 sc, 2 sctog* repeat around (30)
    Round 15: *3 sc, 2 sctog* repeat around (24)
    Round 16: (Black Yarn) *3 sc, 2 sc in next st* repeat around (30)
    Round 17: *4 sc, 2 sc in next st* repeat around (36)
    Round 18: sc around (36)
    Sew in the ears/eyes/nose/mouth.


    Rounds 19-23: (White Yarn) sc around (36)
    Round 24: *4 sc, sctog* repeat around (30)
    Round 25: *3 sc, sctog* repeat around (24)
    Round 26: *2 sc, sctog* repeat around (18)
    Start adding stuffing.
    Round 27: *2 sc, sctog* repeat around (12)
    Round 28: *2 sc, sctog* repeat around (6)
    Close it off.

Feet (x2) Black Yarn:

    Round 1: 6 sc in magic ring (6)
    Round 2: 2 sc in each st around (12)
    Round 3: *1 sc, 2 sc in next st* repeat around (18)
    Round 4: sc around in back loop only (18)
    Round 5: 6 sc, 2 sctog for 12 st (12)
    Round 6: 6 sc, 3 sctog for 6 st (8)
    Rounds 7-8: sc around (8)
    Finish off leaving tail for sewing. Add stuffing.

Arms (x2) Black Yarn:

    Round 1: 6 sc in magic ring (6)
    Round 2: 2 sc in each st around (8)
    Rounds 3-6: sc around (8)
    Finish off leaving tail for sewing. Add stuffing.


Arms to body, feet to body, and you'll have a little panda :)

Or you can leave the feet and arms out and it'll look like a matryoska-panda-doll! (I kinda liked it this way)

Wednesday, January 30, 2013

Dragon and Kitty

Today, I wanted to share the 2 amigurumis I made for my nephew and niece, which unfortunately took me longer than I would have liked to. I've finally finished them earlier this week and now I need to send them to France :)

My nephew wanted a dragon so this is what he'll receive:

As my dear husband would say: it's an hippo with wings!
Yes yes, it might not be a traditional dragon, but it was made with love, so even if he's a little different, I'm sure my nephew will love him!


My little niece, as most of the girls of her age, adores Hello Kitty so this is what she'll soon have:

Oddly enough, I would have thought the nose was pink, but on most of the pictures I could see, the nose was yellow, so might as well stay the closest I could to the original :)

I will make a third dress before I'm packing these two little crocheted things and hopefully they'll like them!

Edit: finished 2 more dresses!


Wednesday, January 23, 2013

Batmaaaan ... Tadadadadadaaaa


Several months ago, my boss told us that he was going to Texas in another branch of the company as a permanent move. As he's always told me how cute the crochetted little things that I made were, I wanted to make one for him.
Yes but... what? I quickly remembered a video he showed me some time before with marvel superheroes represented in Wallace and Gromit style.

Here it was! The hopefully perfect idea for his going away gift.

Since he really liked it, I figured that maybe someone else would find this pattern cute and would want to give it a try. As most of the things that I freehand, I only made one copy so I'm unsure whether the pattern is fully accurate or not. If the pattern seems unclear, don't hesitate to ask me any clarifications.


I made the head and the body separately then attached them together because I wanted to still give a « neck » feeling, which didn't work as much as I expected. I'll probably make another one by just going from top to bottom in one piece then change this pattern accordingly.

Requirements:

  • Crochet Hook G (4,25mm)
  • Tapestry Needle
  • Black, Beige, Yellow White yarn
  • Black thread + white buttons
  • Stuffing

Abbreviations / Terminology used:

  • st: stitch
  • sc: single crochet
  • ss: slip stitch
  • hdc: half double crochet
  • fhdc: foundation half double crochet
  • 2 sc in next st (increase)
  • 2 sctog: 2 single crochet together (decrease)
  • blo: back loop only

Head:

    Round 1: (Black yarn) 6 sc in magic ring (6)
    Round 2: 2 sc in each st around (12)
    Round 3: *1 sc, 2 sc in next st* repeat around (18)
    Round 4: *2 sc, 2 sc in next st* repeat around (24)
    Round 5: *3 sc, 2 sc in next st* repeat around (30)
    Rounds 6-9: sc around (30)
    Rounds 10-16: (Change to Beige yarn) sc around (30)
    Round 17: *3 sc, sctog* repeat around (24)
    Round 18: sctog around (12)
Finish off.

Ears (black yarn only):

    Round 1: 6 sc in magic ring (6)
    Round 2: *2 sc, 2 sc in next st* repeat (8)
    [Rounds 3-4: sc around (8) Add these rounds for only 1 of the 2 ears]
    Round 5: *2 sc in next st* repeat 3 times, *sctog* repeat once (10)
Finish off leaving tail for sewing

Body:

    Round 1: (Black yarn) 6 sc in magic ring (6)
    Round 2: 2 sc in each st around (12)
    Round 3: *1 sc, 2 sc in next st* repeat around (18)
    Round 4: *2 sc, 2 sc in next st* repeat around (24)
    Round 5: *3 sc, 2 sc in next st* repeat around (30)
    Round 6: sc in blo around (30)
    Rounds 7-9: sc around (30)
    Round 10: (Change to Yellow yarn) sc around (30)
    Rounds 11-13: (Change to Black yarn) sc around (30)
    Round 14: *3 sc, sctog* repeat around (24)
Finish off leaving tail for sewing

Feet (x2) black yarn only:

    Round 1: 5 sc in magic ring (5)
    Round 2: 2 sc in each st around (10)
    Round 3: *1 sc, 2 sc in next st* repeat around (15)
    Round 4: sc in blo around (15)
    Round 5: 5 sc, sctog for next 10 st (10)
    Round 6: 4 sc, sctog for next 2 st, 2 sc (8)
    Rounds 7-8: sc around (8)
    Finish off leaving tail for sewing. Add stuffing.

Arms (x2) black yarn only:

    Round 1: 6 sc in magic ring (6)
    Round 2: sc around (6)
    Round 3: (forming the first glove bump) 3 sc, ch 2, ss in ch, 3 sc (6)
    Round 4: sc around (6)
    Round 5: *2 sc, 2 sc in next st* repeat around (8)
    Round 6: (forming the second glove bump) 5 sc, ch 2, ss in ch, 3 sc (8)
    Round 7: sc around (8)
    Round 8: *2 sc, sctog* around (6)
    Finish off leaving tail for sewing. Add stuffing.

Bat Logo:

(Yellow yarn) 5 fhdc, 2 hdc in last fhdc, 4 hdc on the other side, ss in first hdc.
(Black yarn) Add a first horizontal line, then a vertical, and finish of by putting « wings ».


Then all is left is to assemble all the pieces together :)
Add 2 white buttons with black thread for the eyes, and some black thread for the mouth.
Feet to body, arms to body, logo on body, ears to head, head to body!

I unfortunately didn't think about taking more pictures as I was making it since I had only a few hours to create the pattern and the batman. I'll try to take more pictures if I get the chance to make another one!


Happy crochetting!


Saturday, December 8, 2012

Marshi... Mallow... Mashimaro!!!

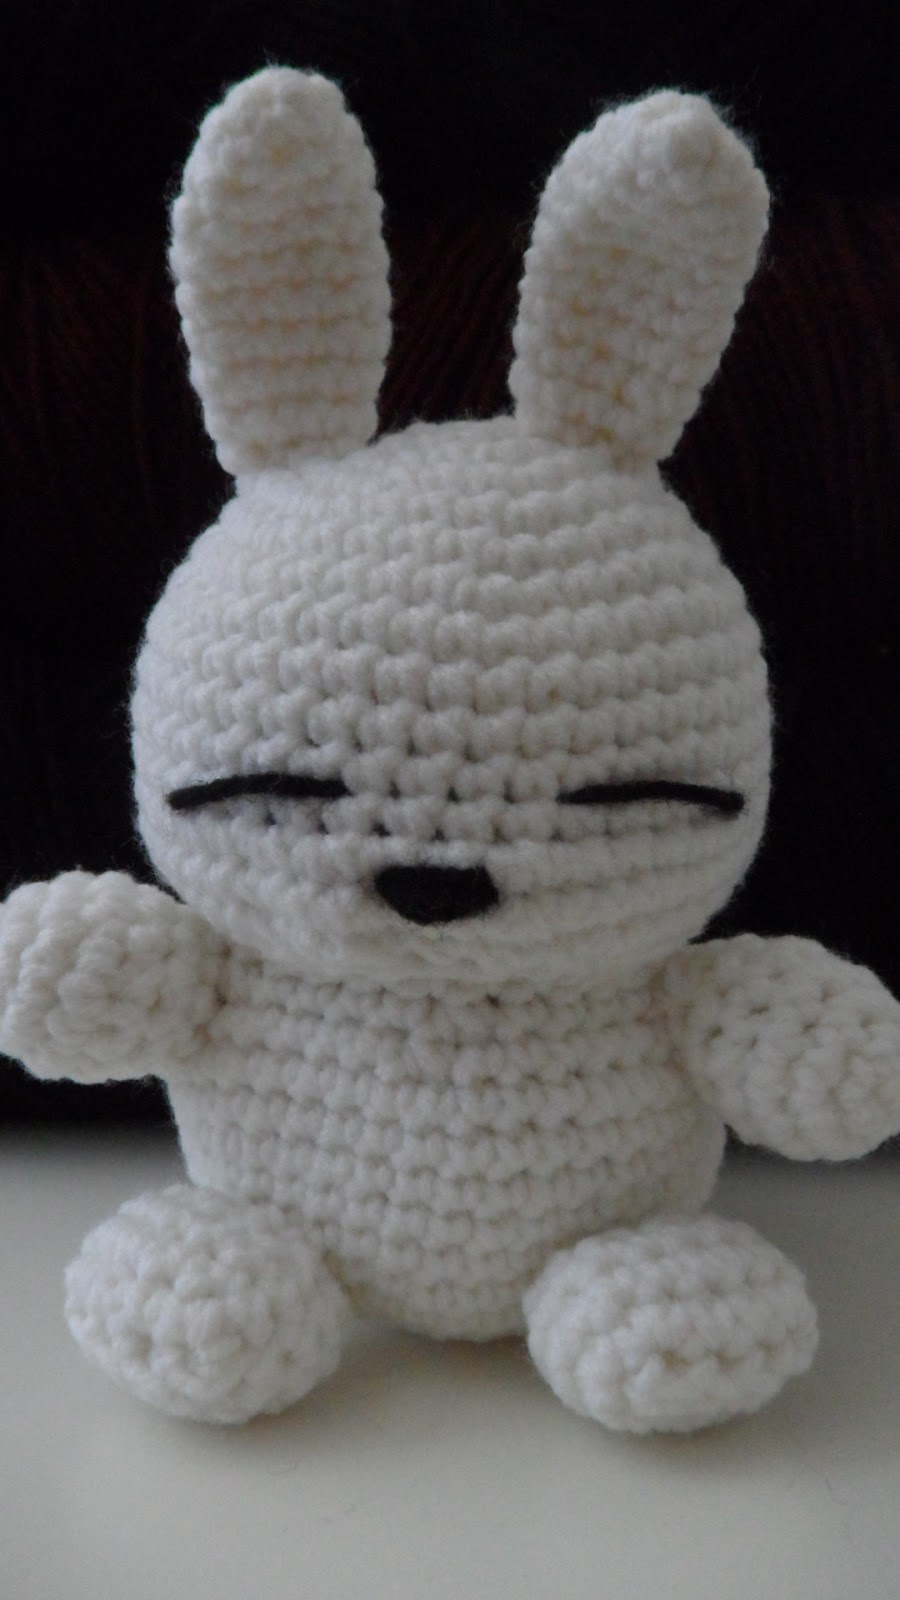
A couple of months ago, I made a Mashimaro for a friend of mine who LOVES this little naughty bunny! I actually didn't know about him and had to look him up to discover his videos and realized that it really wasn't the "cute little fluffy bunny" type. But regardless of who he is, I couldn't help but found him extremely cute! So chubby!
It was pretty fun to write the pattern so here it is for whoever would like to give it a try!


Requirements:

  • Crochet Hook F (3,75mm) or G (4,25mm) depending on preferences
  • Tapestry Needle
  • White yarn
  • Black thread
  • Stuffing

Abbreviations / Terminology used:

  • st: stitch
  • sc: single crochet
  • ss: slip stitch
  • fsc: foundation single crochet
  • 2 sc in next st (increase)
  • 2 sctog: 2 single crochet together (decrease)

Head:

    Round 1: 6 sc in magic ring (6)
    Round 2: 2 sc in each st around (12)
    Round 3: *1 sc, 2 sc in next st* repeat around (18)
    Round 4: *2 sc, 2 sc in next st* repeat around (24)
    Round 5: *3 sc, 2 sc in next st* repeat around (30)
    Round 6: *4 sc, 2 sc in next st* repeat around (36)
    Round 7: *5 sc, 2 sc in next st* repeat around (42)
    Rounds 8-12: sc around (42)
    Round 13: 18 sc, 2 sc in next 6 st, 18 sc (48)
    Round 14: sc around (48)
    Round 15: 18 sc, 2 sctog in next 6 st, 18 sc (42)
    Round 16: *5 sc, sctog* repeat around (36)
    Round 17: *4 sc, sctog* repeat around (30)
    Round 18: *3 sc, sctog* repeat around (24)
    Round 19: *2 sc, sctog* repeat around (18)
Add the nose and the eyes with the black thread before closing off the head so that it's easier to hide the tails and secure the knots.
    Round 20: *1 sc, sctog* repeat around (12) (add stuffing)
    Round 21: *sctog* repeat around (6) (finish stuffing the head if needed)
Close and Finish off

Body:

    Round 1: 6 sc in magic ring (6)
    Round 2: 2 sc in each st around (12)
    Round 3: *1 sc, 2 sc in next st* repeat around (18)
    Round 4: *2 sc, 2 sc in next st* repeat around (24)
    Round 5: *3 sc, 2 sc in next st* repeat around (30)
    Round 6: *4 sc, 2 sc in next st* repeat around (36)
    Round 7: *5 sc, 2 sc in next st* repeat around (42)
    Rounds 8-13: sc around (42)
    Round 14: *5 sc, sctog* repeat around (36)
    Round 15: *4 sc, sctog* repeat around (30)
Finish off leaving tail for sewing

Feet (x2):

    Round 1: 3 fsc, 3 sc in turn, 2 sc, 2 sc in turn (10)
    Round 2: 2 sc, 2 sc in 1 for the 3 next st, 2 sc, 2 sc in 1 for the 3 next st (16)
    Rounds 3-4: sc around (16)
    Round 5: sctog around (8)

Arms (x2):

    Round 1: 5 sc in magic ring (5)
    Round 2: 2 sc in each st around (10)
    Round 3: *1 sc, 2 sc in next st* repeat around (15)
    Round 4: sc around (15)
    Round 5: *1 sc, sctog* repeat around (10)
    Round 6: sc around (10)
    Finish off leaving tail for sewing. Add stuffing.

Tail:

    Round 1: 6 sc in magic ring (6)
    Round 2: 2 sc in each st around (12)
    Round 3: sctog around (6)

Ears (x2):

    Round 1: 6 sc in magic ring (6)
    Round 2: *2 sc, 2 sc in next* repeat around (8)
    Round 3: *3 sc, 2 sc in next st* repeat around (10)
    Rounds 4-8: sc around (10)
    Round 9: *3 sc, sctog* repeat around (8)
    Round 6: sc around (8)
    Finish off leaving tail for sewing. No stuffing needed for the ears.


Assemble the cute bunny now: arms, legs and tail to the body, ears to the head, then body and head together :)


Now you can dress him up if you feel like it. I decided to add a little purple beanie and a matching scarf since I knew my friend loved this color.


The beanie was made as follow with purple yarn:
    Round 1: ch 24, join with ss (24)
    Round 2: ch 3, *3 dc, 2 dc in next st (back loop only)* repeat around, join with ss (30)
    Round 3: ch 3, *2 dc, 2 dc in next st (back loop only)* repeat around, join with ss (40)
    Round 4: ch 3, *9 dc, 2 dc in next st (back loop only)* repeat around, join with ss (44)
    Round 5: ch 3, *10 dc, 2 dc in next st (back loop only)* repeat around, join with ss (48)
I added a round of crab stitch in aqua yarn for finishing it off.

The scarf was a simple 50 fhdc (foundation half double crochet) in purple yarn.


I hope you liked him and happy crocheting :)